Mobile Corner
Build a Xamarin.Forms Application with MvvmCross
- By Nick Randolph
- 05/16/2018

Every mobile and desktop platform has its own technology stack, or stacks, that developers can use to build applications. It used to be acceptable to build an application for a single platform, or perhaps two, which meant learning and developing with the tools was relatively straightforward.
However, as the number of target platforms grows, so does the cost of building applications that work on each of the platforms. This is where cross-platform frameworks offer the ability to build an application once and have it target multiple platforms. In this article I'm going to look at Xamarin.Forms, a framework that sits on top of the cross-platform tooling offered by Xamarin, and how it can be used in conjunction with MvvmCross to rapidly develop applications for iOS, Android and Universal Windows Platform (UWP). Xamarin.Forms also supports MacOS, Tizen and Windows Presentation Foundation (WPF), giving it one of the widest ranges of platforms of any cross-platform framework.
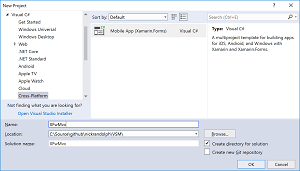
The best way to demonstrate how to get started with Xamarin.Forms and MvvmCross is to jump in and build out an application. In this case our application is going to load a collection of contacts into a list, and then allow the user to select a contact to view their details. We'll get started by creating a new application based on the Mobile App (Xamarin.Forms) project template, shown in Figure 1.
 [Click on image for larger view.]
Figure 1. Mobile App (Xamarin.Forms) New Project Template
[Click on image for larger view.]
Figure 1. Mobile App (Xamarin.Forms) New Project Template
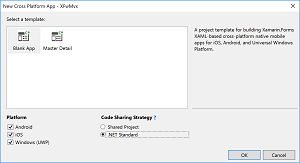
After giving the application a name, the next prompt, Figure 2, will be to define which application template to use, which platforms to support and which code sharing strategy to use. In this case we'll go with the Blank App, since we're going to create the pages and navigation ourselves; we'll select all three platforms and we'll use the .NET Standard code sharing strategy.
Before talking about the choice of code-sharing strategy, let's quickly look at what Xamarin.Forms is. Xamarin, now part of Microsoft, identified that a large proportion of applications being built would benefit from the layout being defined once in a platform-agnostic way, with it being rendered on each supported platform. While it is possible to define the layout of your application in code, most Xamarin.Forms applications define the layout of each page, and controls, of an application using XAML. Unlike XAML used for WPF or UWP applications, Xamarin.Forms XAML is platform agnostic, making it perfect for declarative layout in a separate library. The Code Sharing Strategy defines where the XAML files, and their associated code-behind files, will be placed, either in a Shared Project or in a .NET Standard library.
 [Click on image for larger view.]
Figure 2. Customizing the New Cross-Platform App Template
[Click on image for larger view.]
Figure 2. Customizing the New Cross-Platform App Template
Just as a side note, the Shared Project should never be used as it was originally created to allow for bulk sharing of files between projects such as between a Windows 8 application and a Windows Phone 8 application. This is no longer required. Instead, if you want to include platform-specific functionality into a class library, you should be looking at using the new multi-targeting support provided by Visual Studio.
The newly created solution is made up of four projects: three target, or head, projects that represent the three platforms that were selected when creating the project, and a .NET Standard library that contains the XAML for the application, App.xaml, and the first page of the application, MainPage.xaml. To make sure everything was created properly you should build and run each of the target platforms to make sure they run without issue.
Like other XAML platforms, Xamarin.Forms supports databinding and the MVVM pattern for wiring up data into the UI. Rather than writing logic directly into the code-behind files (for example, MainPage.xaml.cs is the code-behind file for MainPage.xaml), MVVM prescribes the use of a ViewModel that is connected to the page (that is, the View) using data binding.
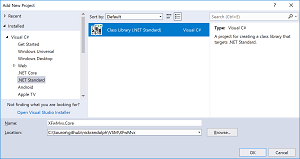
Rather than storing our ViewModels in the same project as the Views, we're going to create another project based on the Class Library (.NET Standard) project template, shown in Figure 3. While pages and controls for Xamarin.Forms are defined in a platform-agnostic way, there is still the dependency on the Xamarin.Forms framework. By creating a separate project in which to place our ViewModels, we can create them in a way that doesn't lock them into Xamarin.Forms. This is less about reusing the ViewModels across other frameworks, but it helps to enforce a separation of concerns and makes it easier to test the ViewModels.
 [Click on image for larger view.]
Figure 3. Creating a Class Library (.NET Standard)
[Click on image for larger view.]
Figure 3. Creating a Class Library (.NET Standard)
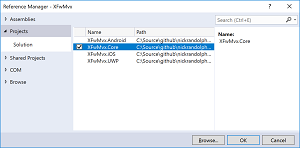
After creating the new library, we need to add a reference to the library into each of the four other projects, as illustrated in Figure 4.
 [Click on image for larger view.]
Figure 4. Add Reference to Core Project
[Click on image for larger view.]
Figure 4. Add Reference to Core Project
Rather than manually creating instances of our ViewModel and wiring them up to the corresponding View, this is where we are going to leverage MvvmCross, an application framework (rather than a platform framework) that helps abstract the administrative code of structuring an application, while prompting a clear separation of concerns between different parts of your application.
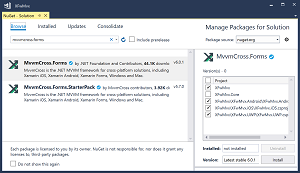
Before we add a reference to MvvmCross, we'll make sure that all of the existing NuGet package references have been updated to the latest stable version. After doing this we'll add a reference to MvvmCross.Forms, shown in Figure 5 (don't use the StarterPack as that was deprecated with v6 of MvvmCross). Add the reference to MvvmCross.Forms to all projects except the class library that we created for the ViewModels.
 [Click on image for larger view.]
Figure 5. Add NuGet Reference to MvvmCross.Forms
[Click on image for larger view.]
Figure 5. Add NuGet Reference to MvvmCross.Forms
Next, go ahead and add a reference to the MvvmCross package to all projects.
Before we can start building out our application there are a few more administrative changes we need to make in order to take advantage of MvvmCross. We'll start in the Core library by renaming Class1 to App and setting it to inherit from the MvxApplication class, as shown in the following code:
public class App: MvxApplication
{
  public override void Initialize()
  {
    base.Initialize();

    RegisterAppStart<MainViewModel>();
  }
}
At this stage the role of the App class is simply to define what the entry point is for the application. One of the biggest differences between a vanilla Xamarin.Forms app and one that uses MvvmCross is that with MvvmCross the navigation is controlled at a ViewModel level. This includes the starting point, which in this case we're setting to be the MainViewModel. By convention, MvvmCross will associated this with a View called MainPage.
Currently MainViewModel doesn't exist, so we'll create a new folder called ViewModels and create a new class, MainViewModel, with the following code:
public class MainViewModel: MvxViewModel
{
  public string WelcomeText => "Hello Xamarin.Forms with MvvmCross";
}
That's it for the Core library. Next we'll look at the library that contains the XAML. Currently there are two XAML files, App.xaml and MainPage.xaml. App.xaml is used for holding resources such as colors, brushes, styles, templates etc that will be used across multiple pages of the application. As MvvmCross handles the majority of the application wide startup logic, you can remove everything out of the code behind file, App.xaml.cs, leaving on the constructor, with a call to InitializeComponent (required in order to parse the XAML containing resources and so on):
public partial class App : Application
{
  public App ()
  {
    InitializeComponent();
  }
}
There are a few more changes required for the MainPage.xaml, but we'll start by moving it into a newly created folder called Views. Next, we need to change the base class of the MainPage from ContentPage to MvxContentPage. While we're updating the XAML, we'll also change the Label so that it is data bound to the WelcomeText property on our MainViewModel. Don't forget to update the base class in both the XAML and the code-behind file, MainPage.xaml.cs:
<?xml version="1.0" encoding="utf-8" ?>
<views:MvxContentPage
    xmlns="http://xamarin.com/schemas/2014/forms"
    xmlns:views="clr-namespace:MvvmCross.Forms.Views;assembly=MvvmCross.Forms"
    xmlns:x="http://schemas.microsoft.com/winfx/2009/xaml"
    x:Class="XamarinFormsWithMvvmCross.Views.MainPage">
    <StackLayout>
        <!-- Place new controls here -->
        <Label
           Text="{Binding WelcomeText}"
           HorizontalOptions="Center"
           VerticalOptions="CenterAndExpand" />
    </StackLayout>
</views:MvxContentPage>
That's it for the moment with regards to changes to the XAML files.
In order for our application to run, we need to make some changes to each of the target platforms. By default the Visual Studio Xamarin.Forms template has a significant amount of template code that is added as a starting point for developers. With MvvmCross most of this code is no longer required. We'll go through each platform in turn, starting with UWP.
In the UWP project, change MainPage to inherit from MvxFormsWindowsPage and remove everything except the constructor with a call to InitializeComponent in the code-behind file, MainPage.xaml.cs:
public sealed partial class MainPage
{
  public MainPage()
  {
    InitializeComponent();
  }
}
Add a new class, ProxyMvxApplication, with the following code. This class is required because XAML in UWP can't handle generic base types, so the ProxyMvxApplication abstracts the base class into a non-generic type:
public abstract class ProxyMvxApplication : MvxWindowsApplication<MvxFormsWindowsSetup<Core.App, XFwMvx.App>, Core.App, XFwMvx.App, MainPage>
{
}
Change App.xaml and App.xaml.cs in the UWP project to inherit from ProxyApplication and remove all code except the constructor with the call to InitializeComponent in App.xaml.cs:
sealed partial class App
{
  public App()
  {
    this.InitializeComponent();
  }
}
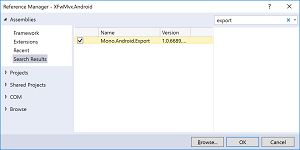
With Android, if you see an "Error CS0234 The type or namespace name 'App' does not exist in the namespace," you just need to add a reference to the Mono.Android.Export library, as shown in Figure 6.
 [Click on image for larger view.]
Figure 6. Adding Missing Reference to Export Library
[Click on image for larger view.]
Figure 6. Adding Missing Reference to Export Library
Setting up the Android project only requires a simple change to the MainActivity class. We're going to rename MainActivity to RootActivity, and update the code as follows:
[Activity(Label = "XFwMvx", Icon = "@mipmap/icon", Theme = "@style/MainTheme",
MainLauncher = true, ConfigurationChanges = ConfigChanges.ScreenSize | ConfigChanges.Orientation)]
public class RootActivity : MvxFormsAppCompatActivity<MvxFormsAndroidSetup<Core.App, App>, Core.App, App>
{
}
Lastly, we need to update the iOS project by adjusting the AppDelegate code as follows:
[Register("AppDelegate")]
public partial class AppDelegate
: MvxFormsApplicationDelegate<MvxFormsIosSetup<XFwMvx.Core.App, XFwMvx.App>, XFwMvx.Core.App, XFwMvx.App>
{
}
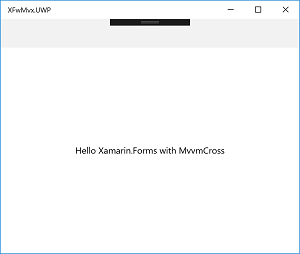
With all these changes done, all three platforms are ready. At this point it's important to run each of the applications to make sure they're all setup correctly. Each platform, iOS, Android and UWP, should run and display "Hello Xamarin.Forms with MvvmCross" in the middle of the screen, similar to Figure 7.
 [Click on image for larger view.]
Figure 7. Welcome to Xamarin Forms with MvvmCross
[Click on image for larger view.]
Figure 7. Welcome to Xamarin Forms with MvvmCross