Mobile Corner
Enterprise Distribution of Windows Phone Applications
Nick Randolph discussed how Windows Phone applications can be deployed within a company using enterprise distribution.
- By Nick Randolph
- 09/11/2014
One feature introduced in Windows Phone 8 is the ability to self-publish and distribute applications within an organization, bypassing the Windows Phone Store. Often referred to as enterprise or company distribution, it makes Windows Phone a great line-of-business tool, as applications can be rapidly built, tested, and distributed internally without any dependencies on external testing, certification, or publishing. This feature was extended in Windows Phone 8.1 to support both XAP and APPX packaging formats, which includes support for XAPs built against the Windows Phone 8.1 SDK.
In this article, you'll learn what you need in order to sign and distribute any Windows Phone application.
Enterprise Distribution Basics
You can distribute a Windows Phone application using enterprise distribution in two ways: either via a Mobile Device Management (MDM) tool, or by simply side-loading the application.
An MDM is typically used by organizations that want to provision and control functionality on devices connecting into the organization. A user enrolls the device into the organization (this process often starts on the phone by selecting Settings | Company/Workplace | Add Account), at which point the MDM typically pushes down any policies, certificates, accounts and applications that are required by the organization.
The alternative to using an MDM is that applications are hosted on a secured Web site (to prevent unauthorized access), or distributed via a rights-managed e-mail (to prevent forwarding outside the company). Clicking on the application link or attachment triggers the installation of the application. This method doesn't allow for effective management or updating of the application, so it's not recommended for large-scale deployments.
Both ways of performing enterprise distribution rely on a couple of points:
- Applications being distributed need to be signed using an enterprise-signing certificate.
- The signing certificate needs to be trusted by the devices to which the application is going to be deployed.
The enterprise-signing certificate used to sign applications needs to be sourced from Symantec (I'll come back to this) and is a .PFX file. This needs to be converted into an .AETX file using the AETGenerator tool that's part of the Windows Phone SDK (more on this, later). In the case of using an MDM, the .AETX file is typically uploaded into the MDM and deployed during the enrollment phase of a device. In the case of side-loading, the .AETX can either be attached to an e-mail or hosted on a Web site. Clicking on the attachment or the link on the Web page will trigger the file to install on the device. Both scenarios result in the device being set up, ready for enterprise-signed applications to be installed.
If an MDM is used, once an application has been signed it's then uploaded into the MDM. Each MDM is different in its implementation, but usually they provide a mechanism to then assign applications to individuals or groups of users or devices. The application is then available for users to install on their devices. If applications are being distributed without an MDM they can either be attached to an e-mail, or hosted on a Web site. Again, clicking on the attachment or the link will result in the application being installed.
Acquiring an Enterprise-Signing Certificate
Now, I'll show you how to create a Windows Phone Store Account and obtain an enterprise-signing certificate. Here are the steps, and one involves heading over to the Symantec site:
1. Create a Windows Phone Store Account
In order to acquire an enterprise-signing certificate, you first need a Windows Phone Store account. Sign up for a new account at dev.windows.com/join, or access your account at dev.windowsphone.com/dashboard. Be aware of a catch here: Your account needs to be a company account, not an individual -- make sure you select the right box, as it's extremely difficult to change it at a later stage.
2. Obtain an Enterprise Mobile Code-Signing Certificate
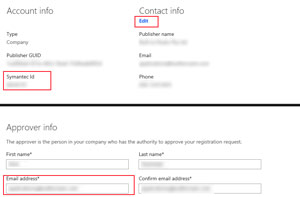
A code-signing certificate can only be purchased from Symantec. You'll need both your Symantec Publisher ID and the Primary Email Address of your Windows Phone Store account. These can be found by logging into your Windows Phone Store account and navigating to the Account tab, as shown in Figure 1. The Symantec Id field is the Symantec Publisher ID required as the first step of the certificate-request process. The Primary Email Address is found by clicking on the Edit link under the Contact info heading; under the Approver info is the Email address field. Use this value during the request process.
 [Click on image for larger view.]
Figure 1. Enter Your Symantec Id and E-mail Address
[Click on image for larger view.]
Figure 1. Enter Your Symantec Id and E-mail Address
Note: Make a record of the computer and browser where the request was made, as you'll need to return to this browser to collect the certificate. Also, make sure you're not using in-private browsing mode, as this may prevent you from retrieving the certificate.
Upon completing the request process you should receive a confirmation e-mail with a series of links and instructions to follow. In short, make sure you follow all the instructions very carefully. Here's a summary of the main points:
- Make sure you're in the same browser on the same computer where you made the certificate request.
- Click on the links in the certificate confirmation e-mail to install both the root and intermediary certificates. These need to be added to the Trusted Root Certification Authorities and Intermediate Certification Authorities stores, respectively, on the machine, not the default store, on a PC, and should be marked as Always Trusted on a Mac (full instructions are here.)
- Click on the link to retrieve the certificate and make sure it opens in the browser that made the certificate request. This will install the signing certificate into the certificate store (PC) or keychain (Mac). At this point open the certificate (run certmgr.msc on a PC or open the keychain manager on a Mac) and verify that it's fully trusted.
- Export the certificate to a .PFX file. Make sure you include the private key and specify a password whilst exporting the certificate (full instructions are here.)
3. Validate Your Certificate
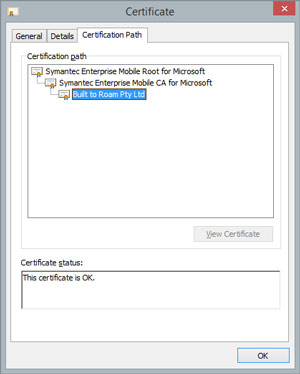
After exporting the .PFX file you can validate it by double-clicking on it and installing it, selecting a store other than the default. Open certificate manager (run certmgr.msc) and navigate to the store into which you installed the certificate. Locate the certificate by looking for certificates in the store issued by Symantec Enterprise Mobile CA for Microsoft. Open the certificate and look at the Certification Path tab, as shown in Figure 2.
 [Click on image for larger view.]
Figure 2. Open Up the Certificate to Validate It
[Click on image for larger view.]
Figure 2. Open Up the Certificate to Validate It
The status of your certificate should say that the certificate is OK and you should see three nodes in the certificate path, the first two starting with Symantec and the last being your company name.
Signing Your First Application
Now I'll show you how to create and sign three applications that represent the different platform configurations you might have to deal with: Windows Phone 8 XAP, Windows Phone 8.1 XAP and Windows Phone 8.1 APPX. For each application, I'll show how to sign it, ready it for distribution, and then demonstrate how you can install them on either the emulator or a real device to validate that they've been correctly signed.
Important: There's a known issue with the final release of Visual Studio 2013 Update 2, which broke the signing of Windows Phone applications. This means you'll need to upgrade to Update 3, which should fix any signing issues you might encounter. If you see an error stating "Installation failed: Install failed. Please contact your software vendor. (Exception from HRESULT: 0x80073CF9)," you should upgrade to Update 3.
In Visual Studio, I've created an empty solution and added three Windows Phone applications based on the Hub App (Windows Phone) template, TestWP81Appx, the Panorama App (Windows Phone Silverlight) template, TestWP81Xap, and the Pivot App (Windows Phone Silverlight) template, TestWP8Xap. When creating TestWP81Xap and TestWP8Xap I selected the appropriate platform version, Windows Phone 8.1 and Windows Phone 8, respectively, when prompted. Out of the box these applications are all able to run in the emulator or on a developer-unlocked device. I'll now sign each of these applications so they can be distributed to any Windows Phone.
Signing a Windows Phone 8 Silverlight Application: TestWP8Xap
The distribution package for a Windows Phone Silverlight application (for both TestWP8Xap and TestWP81Xap projects) is a .XAP file. When you do a build within Visual Studio, this file is automatically generated and can be found by default in the appropriate build configuration sub-folder under /bin (/bin/debug when building in Debug and /bin/release when building in Release mode). The .XAP file is typically named after the build configuration and platform selected; for example, TestWP8Xap_Debug_AnyCPU.xap implies it was built in Debug, targeting Any CPU.
There are multiple steps involved in preparing and signing an application ready for enterprise distribution. However, this has been simplified into a set of Windows PowerShell scripts, one for each platform configuration:
1. Windows Phone 8 .XAP:
C:\Program Files (x86)\Microsoft SDKs\WindowsPhone\v8.0\Tools\MDILXAPCompile\BuildMDILXap.ps1
2. Windows Phone 8.1 .XAP:
C:\Program Files (x86)\Microsoft SDKs\WindowsPhone\v8.1\Tools\MDILXAPCompile\BuildMDILSL81XAP.ps1
3. Windows Phone 8.1 .APPX:
C:\Program Files (x86)\Microsoft SDKs\WindowsPhoneApp\v8.1\Tools\MDILXAPCompile\BuildMDILAPPX.ps1
In this case, you want to use the signing script for Windows Phone 8 .XAP. The signing process typically creates some additional files, so it's worth placing both the file to be signed and the signing certificate in a folder by themselves -- this will help locate the signed file and review any log information if signing doesn't complete successfully.
To invoke the signing script you can either use the Windows PowerShell prompt, or use a regular command prompt. From a command prompt the Windows PowerShell command to invoke requires the path to the file to be signed, the path to the signing certificate and the password, in this case `XXXXX', on the certificate file (which I set when I exported the certificate after acquiring it from Symantec):
powershell.exe -ExecutionPolicy Unrestricted -File "c:\program files (x86)\Microsoft SDKs\Windows Phone\v8.0\Tools\MDILXAPCompile\BuildMDILXap.ps1" -xapfilename "C:\temp\entdistsigning\TestWP8Xap_Debug_AnyCPU.xap" -pfxfilename "c:\temp\entdistsigning\mycertificate.pfx" -password XXXXX
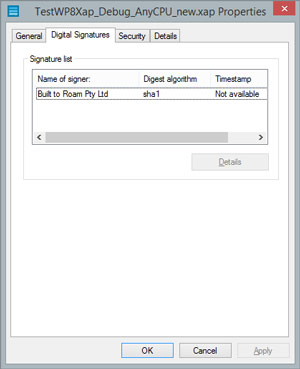
Running this command will indicate success or failed to complete the signing process -- this is easy to determine because the output messages are colored green (success) or red (failure). After running this command, three new files are created in the same folder as the original .XAP file: MDILOutput.log, XapsigntoolOutput.log and TestWP8Xap_Debug_AnyCPU_new.xap. The two log files are useful if the signing process doesn't complete successfully. The new .XAP file is signed, ready for distribution. Right-clicking on this .XAP file and selecting Properties will display additional information about the Digital Signature used to sign the application, as shown in Figure 3.
 [Click on image for larger view.]
Figure 3. Digital Signature for Signed Application
[Click on image for larger view.]
Figure 3. Digital Signature for Signed Application
In addition to signing the .XAP file, this process also signs any .DLL files contained in the .XAP. Changing the .XAP file extension to .ZIP allows the contents of the application to be extracted; in the Properties window of the TestWP8Xap.dll there's also a Digital Signatures tab that contains the same signature information as the .XAP. It's also worth observing that this process doesn't encrypt the .XAP file or its contents.
Signing a Windows Phone 8.1 Silverlight Application: TestWP81Xap
Signing a Windows Phone 8.1 .XAP file is very similar. The output file when doing a normal Build in Visual Studio is a .XAP file, again located in the appropriate /bin sub-folder, named according to the build configuration and platform architecture (TestWP81Xap_Debug_AnyCPU.xap). You invoke the following command to sign the Windows Phone 8.1 .XAP file:
powershell.exe -ExecutionPolicy Unrestricted -File "c:\program files (x86)\Microsoft SDKs\Windows Phone\v8.1\Tools\MDILXAPCompile\BuildMDILSL81XAP.ps1" -xapfilename "c:\temp\entdistsigning\TestWP81Xap_Debug_AnyCPU.xap" -pfxfilename "c:\temp\entdistsigning\mycertificate.pfx" -password XXXXX -inputFolder "C:\temp\entdistsigning\input" -outputfolder "C:\temp\entdistsigning\output"
The syntax of this command is slightly different in that you can specify an input and output folder. During execution, this command will create these folders if they don't already exist. The contents of the original .XAP file are extracted into the inputFolder. The outputFolder is used to prepare and sign contents in order to create the final .XAP file, which is created in a sub-folder based on the name of the .XAP file (TestWP81Xap_Debug_AnyCPU_optimized), along with three log files that cover the stages of the signing process. Right-clicking on the newly created .XAP and selecting Properties will again reveal the Digital Signatures tab with the information about the signing certificate.